<?xml version="1.0" encoding="utf-8"?><feed xmlns="http://www.w3.org/2005/Atom" ><generator uri="https://jekyllrb.com/" version="3.10.0">Jekyll</generator><link href="https://drkaziu.github.io/feed.xml" rel="self" type="application/atom+xml" /><link href="https://drkaziu.github.io/" rel="alternate" type="text/html" /><updated>2026-05-06T17:59:15+00:00</updated><id>https://drkaziu.github.io/feed.xml</id><title type="html">drkaziu.github.io</title><subtitle>Signal in tech noise</subtitle><entry><title type="html">Vibecoding a Retro Dock Mascot</title><link href="https://drkaziu.github.io/2026/05/06/xcode-vibecode.html" rel="alternate" type="text/html" title="Vibecoding a Retro Dock Mascot" /><published>2026-05-06T00:00:00+00:00</published><updated>2026-05-06T00:00:00+00:00</updated><id>https://drkaziu.github.io/2026/05/06/xcode-vibecode</id><content type="html" xml:base="https://drkaziu.github.io/2026/05/06/xcode-vibecode.html"><![CDATA[<p><img src="/assets/images/retro_dock_mascot.gif" alt="Retro Dock mascot" /></p>

<h2 id="a-small-vibecoding-experiment">A small vibecoding experiment</h2>

<p>I wanted to try building a simple macOS app with AI help. I used Xcode with coding agent. This time I tested Codex.</p>

<p>My starting prompt was:</p>

<blockquote>
  <p>I want to create a simple macOS app with a retro-vibe pixel mascot that moves along the Dock and runs away when I approach it with the mouse. Create a plan how to implement it in a robust, deployable app.</p>
</blockquote>

<p>After Codex created the plan, I continued with:</p>

<blockquote>
  <p>Build it and provide instructions how to run and test the app.</p>
</blockquote>

<p>The idea was simple: a tiny animated mascot living near the Dock, reacting to the mouse, and giving a playful retro feeling.</p>

<p>Press cmd+R and the project is built and running!</p>

<hr />

<h2 id="iterating-on-the-mascot">Iterating on the mascot</h2>

<p>The first version worked, but I did not like the black mascot it created.</p>

<p>So I kept iterating:</p>
<ul>
  <li>first the default mascot</li>
  <li>then a <strong>capybara</strong></li>
  <li>and finally a <strong>ghost</strong></li>
</ul>

<p>The ghost looked the best.</p>

<p>That was probably the most fun part of the process: not only getting code, but also shaping the personality of the app through small prompt changes.</p>

<hr />

<h2 id="why-i-liked-this">Why I liked this</h2>

<p>This felt like a good example of vibecoding.</p>

<p>I did not start with architecture diagrams or a long specification. I started with a fun idea, asked for a plan, then asked the agent to build it, test it, and improve it. From there, I could refine the details I cared about.</p>

<p>A tiny ghost running away from the mouse on the Dock is not an important product.</p>

<p>But it is a fun way to explore Xcode, Swift, and AI-assisted app building.</p>]]></content><author><name></name></author><category term="ai" /><category term="xcode" /><category term="swift" /><category term="macos" /><category term="codex" /><category term="vibecoding" /><summary type="html"><![CDATA[]]></summary></entry><entry><title type="html">Comparing AI Image Generation Tools</title><link href="https://drkaziu.github.io/2026/04/27/ai_image_generation_comparison.html" rel="alternate" type="text/html" title="Comparing AI Image Generation Tools" /><published>2026-04-27T00:00:00+00:00</published><updated>2026-04-27T00:00:00+00:00</updated><id>https://drkaziu.github.io/2026/04/27/ai_image_generation_comparison</id><content type="html" xml:base="https://drkaziu.github.io/2026/04/27/ai_image_generation_comparison.html"><![CDATA[<p><img src="/assets/images/ai_slop_king_joke.png" alt="AI image generation" /></p>

<h2 id="testing-ai-image-generation-tools">Testing AI image generation tools</h2>

<p>I wanted to compare how different AI tools generate images from the same prompts.</p>

<p>At the moment, I have three paid subscriptions: ChatGPT Plus, Grok SuperGrok, and Gemini AI Pro.<br />
This is not a benchmark. It is only my personal research, my current opinion, and a snapshot of how these tools behaved at the time of testing.
Not an endorsement.</p>

<hr />
<p>Experimantal results:</p>

<p><img src="/assets/images/ai_tools_comparison.png" alt="AI image generation comparison" /></p>

<h2 id="prompt-1-cyberpunk--medieval-portrait">
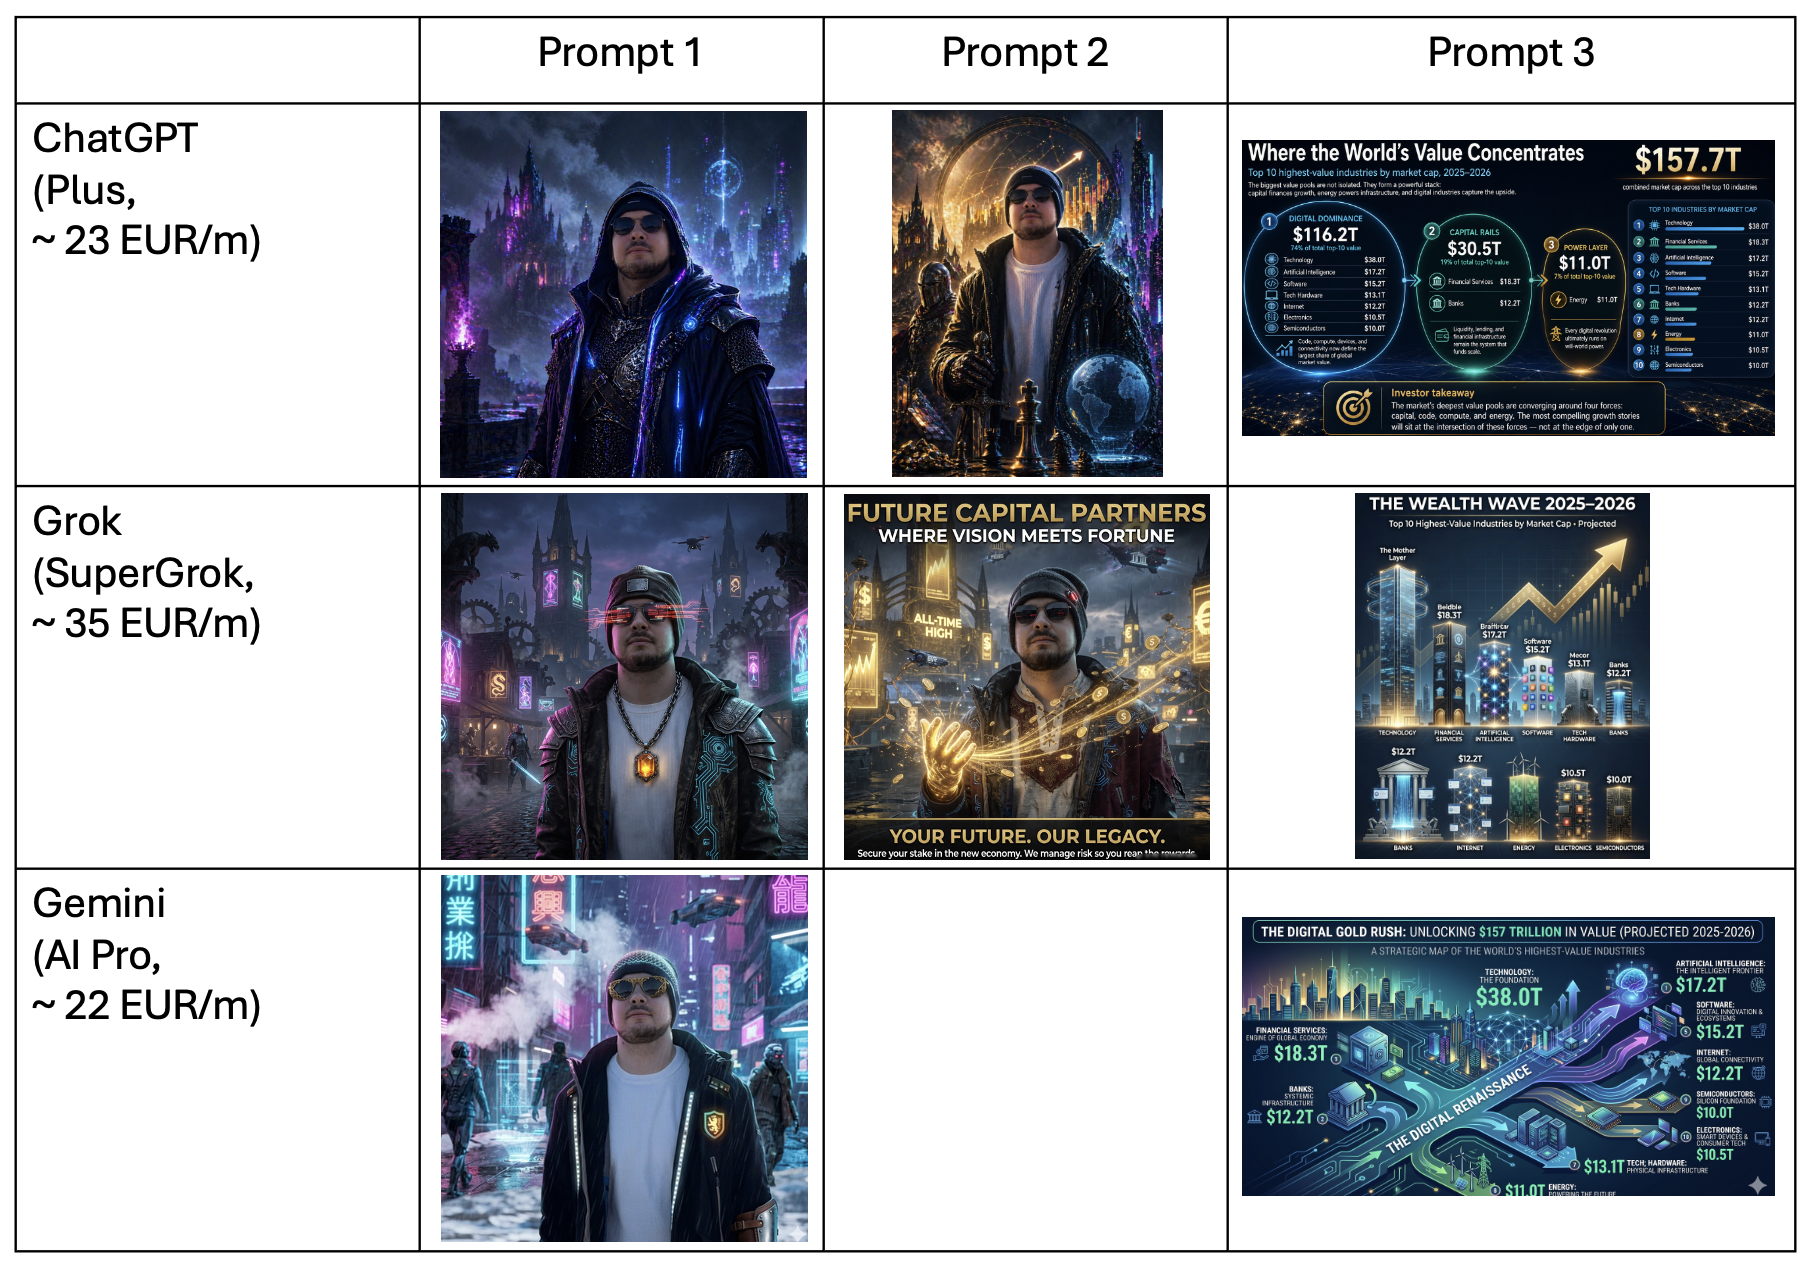
Prompt 1: cyberpunk + medieval portrait</h2>

<p>“Remake this photo of me to Cyberpunk style image, add elements from Medieval ages, make sure there is not text in any language visible.”</p>

<p><strong>ChatGPT</strong> created a polished result with a strong neon cyberpunk mood and a visible medieval/fantasy feeling. It followed the “no text” requirement well.</p>

<p><strong>Grok</strong> gave two images to choose from, which was useful for fast visual exploration. It also suggested creating a video, which fit the creative direction.</p>

<p><strong>Gemini</strong> produced a good-looking cyberpunk street image, but it included visible street signs or ads in an Asian-looking language. That was a problem because the prompt specifically asked for no visible text.</p>

<p>My takeaway: <strong>ChatGPT was the good balance of style and instruction following. Grok was good for quick options and had quite interesting details. Gemini looked good, but missed an important constraint.</strong></p>

<hr />

<h2 id="prompt-2-business-style-ad-poster">Prompt 2: business-style ad poster</h2>

<p>The second prompt was more commercial: selling financial consulting services through a visual ad/poster concept.</p>

<p><strong>ChatGPT</strong> created a strong cinematic image, but it felt more like premium concept art than a direct financial-services ad.</p>

<p><strong>Grok</strong> produced a clearer poster-style result. It felt more sales-oriented, structured, and closer to a marketing visual.</p>

<p><strong>Gemini</strong> just gave a pitch text and did not create image from the first prompt.</p>

<p>My takeaway: <strong>Grok was stronger for the direct ad/poster format and included sales pitch. ChatGPT was more artistic.</strong></p>

<hr />

<h2 id="prompt-3-investor-visual-with-market-cap-numbers">Prompt 3: investor visual with market-cap numbers</h2>

<p>“Make a visual for investors, I will use that as part of a pitch in a funding round. Make me rich. Numbers represent Top 10 highest-value industries by market cap, 2025–2026: Technology — $38.0T; Financial Services — $18.3T; Artificial Intelligence — $17.2T; Software — $15.2T; Tech; Hardware — $13.1T; Banks — $12.2T; Internet — $12.2T; Energy — $11.0T; Electronics — $10.5T; Semiconductors — $10.0T. Make a story, not only show numbers.”</p>

<p>For this test, I started a new chat when possible.</p>

<p><strong>ChatGPT</strong> did the most reasoning before generating. It tried to group the numbers into a story and create an investor-style narrative, not just a chart.</p>

<p><strong>Grok</strong> created the clearest visual. It looked closest to a simple investor slide or pitch poster.</p>

<p><strong>Gemini</strong> also looked good. It had a colorful infographic style, but it was less clean and harder to read than Grok.</p>

<p>My takeaway: <strong>ChatGPT was strong at thinking through the story. Grok made the clearest business visual. Gemini was visually attractive, but less precise.</strong></p>

<hr />

<h3 id="claudeai">ClaudeAI</h3>

<p>ClaudeAI was excluded from this comparison because it could not generate images directly in my setup and suggested using other tools instead.</p>

<hr />

<h2 id="overall-impression">Overall impression</h2>

<p>ChatGPT thinks through the image better. Grok often makes the image clearer.
Gemini can look good, but I would check the details more carefully. Best combo overall - ChatGPT; but Grok very compelling for visuals. Although the price is quite high.</p>

<p>This may change quickly. AI image tools are improving fast, and one model update can change the result completely. Thus, only relevant today.</p>]]></content><author><name></name></author><category term="ai" /><category term="image-generation" /><category term="chatgpt" /><category term="grok" /><category term="gemini" /><category term="tools" /><summary type="html"><![CDATA[]]></summary></entry><entry><title type="html">Agent Instructions for New Projects</title><link href="https://drkaziu.github.io/2026/04/24/instruct-the-agents.html" rel="alternate" type="text/html" title="Agent Instructions for New Projects" /><published>2026-04-24T00:00:00+00:00</published><updated>2026-04-24T00:00:00+00:00</updated><id>https://drkaziu.github.io/2026/04/24/instruct-the-agents</id><content type="html" xml:base="https://drkaziu.github.io/2026/04/24/instruct-the-agents.html"><![CDATA[<p><img src="/assets/images/agent_reading.png" alt="agent sticker" /></p>

<h2 id="teaching-agents-how-i-like-to-work">Teaching agents how I like to work</h2>

<p>I started using VS Code with different AI coding assistants — GitHub Copilot, Claude, and Codex.<br />
All of them can help with code, but I do not want to repeat the same preferences every time:</p>

<ul>
  <li>use Python</li>
  <li>use <code class="language-plaintext highlighter-rouge">.venv</code></li>
  <li>avoid overengineering</li>
  <li>keep projects clean</li>
  <li>never commit secrets</li>
  <li>make the repo portfolio-ready</li>
</ul>

<p>So I created a small reusable project template with simple instruction files for agents.</p>

<p>The idea is simple: every new project should already contain my preferred rules before the agent starts generating files.</p>

<hr />

<h2 id="basic-template-structure">Basic template structure</h2>

<p>My template folder looks like this:</p>

<div class="language-text highlighter-rouge"><div class="highlight"><pre class="highlight"><code>PYTHON-AGENT-TEMPLATE/
├─ .github/
│  └─ copilot-instructions.md
├─ .gitignore
├─ AGENTS.md
└─ CLAUDE.md
</code></pre></div></div>

<p>The main file is:</p>

<div class="language-text highlighter-rouge"><div class="highlight"><pre class="highlight"><code>AGENTS.md
</code></pre></div></div>

<p>This is the source of truth.</p>

<p>The other files only point to it.</p>

<hr />

<h2 id="main-instruction-file">Main instruction file</h2>

<p><code class="language-plaintext highlighter-rouge">AGENTS.md</code> contains the actual rules:</p>

<div class="language-md highlighter-rouge"><div class="highlight"><pre class="highlight"><code><span class="p">-</span> Use Python by default.
<span class="p">-</span> Prefer simple, readable, functional-style code.
<span class="p">-</span> Avoid classes unless they clearly improve the design.
<span class="p">-</span> Use a local <span class="sb">`.venv`</span>.
<span class="p">-</span> Never install packages globally.
<span class="p">-</span> Keep projects clean, minimal, public-safe, and easy to run.
<span class="p">-</span> Make projects secure, professional, and release-ready.
<span class="p">-</span> Prefer this structure: <span class="sb">`src/`</span>, <span class="sb">`tests/`</span>, <span class="sb">`README.md`</span>, <span class="sb">`.env.example`</span>, <span class="sb">`.gitignore`</span>, <span class="sb">`pyproject.toml`</span>.
<span class="p">-</span> For simple scripts, avoid overengineering.
<span class="p">-</span> Separate API calls, parsing, business logic, and output.
<span class="p">-</span> Use git.
<span class="p">-</span> Never commit secrets, API keys, tokens, or <span class="sb">`.env`</span>.
<span class="p">-</span> Keep README short and useful: purpose, install, run, environment variables, examples.
<span class="p">-</span> Mention AI/agent contribution when relevant.
<span class="p">-</span> Check that the project can run from a fresh clone.
<span class="p">-</span> Use small logical git commits.
<span class="p">-</span> Prefer practical over theoretical.
<span class="p">-</span> Prefer clean and minimal over complex.
<span class="p">-</span> Prefer reusable scripts and automation where it saves future work.
<span class="p">-</span> Keep plain-text specs/docs close to code.
<span class="p">-</span> Write beginner-readable but professional code.
<span class="p">-</span> When unsure, choose the simplest maintainable solution.
<span class="p">-</span> Use semantic versioning so projects can be released on GitHub.
<span class="p">-</span> Make projects clear and polished enough to showcase in a portfolio.
</code></pre></div></div>

<hr />

<h2 id="claude-instructions">Claude instructions</h2>

<p>For Claude, I created:</p>

<div class="language-text highlighter-rouge"><div class="highlight"><pre class="highlight"><code>CLAUDE.md
</code></pre></div></div>

<p>With only this inside:</p>

<div class="language-md highlighter-rouge"><div class="highlight"><pre class="highlight"><code>Follow the project instructions in <span class="sb">`AGENTS.md`</span>.
</code></pre></div></div>

<p>This keeps the setup simple.<br />
I do not want to maintain separate instruction files with different rules.</p>

<hr />

<h2 id="github-copilot-instructions">GitHub Copilot instructions</h2>

<p>For Copilot, I created:</p>

<div class="language-text highlighter-rouge"><div class="highlight"><pre class="highlight"><code>.github/copilot-instructions.md
</code></pre></div></div>

<p>With the same pointer:</p>

<div class="language-md highlighter-rouge"><div class="highlight"><pre class="highlight"><code>Follow the project instructions in <span class="sb">`AGENTS.md`</span>.
</code></pre></div></div>

<p>Again, the idea is to keep only one real source of truth.</p>

<hr />

<h2 id="codex-instructions">Codex instructions</h2>

<p>For Codex, I use:</p>

<div class="language-text highlighter-rouge"><div class="highlight"><pre class="highlight"><code>AGENTS.md
</code></pre></div></div>

<p>No extra pointer file is needed.</p>

<hr />

<h2 id="how-i-use-the-template">How I use the template</h2>

<p>When I start a new project, I copy the template folder:</p>

<div class="language-bash highlighter-rouge"><div class="highlight"><pre class="highlight"><code><span class="nb">cp</span> <span class="nt">-R</span> PYTHON-AGENT-TEMPLATE my-new-project
<span class="nb">cd </span>my-new-project
code <span class="nb">.</span>
</code></pre></div></div>

<p>On Windows PowerShell:</p>

<div class="language-powershell highlighter-rouge"><div class="highlight"><pre class="highlight"><code><span class="n">Copy-Item</span><span class="w"> </span><span class="nt">-Recurse</span><span class="w"> </span><span class="nx">PYTHON-AGENT-TEMPLATE</span><span class="w"> </span><span class="nx">my-new-project</span><span class="w">
</span><span class="n">cd</span><span class="w"> </span><span class="nx">my-new-project</span><span class="w">
</span><span class="n">code</span><span class="w"> </span><span class="o">.</span><span class="w">
</span></code></pre></div></div>

<p>Then I ask the agent:</p>

<div class="language-text highlighter-rouge"><div class="highlight"><pre class="highlight"><code>Read AGENTS.md first. Initialize this project according to these instructions.
</code></pre></div></div>

<p>After that, the agent should already know my preferred style before creating the project structure.</p>

<hr />

<h2 id="initialize-git">Initialize git</h2>

<p>For a new project:</p>

<div class="language-bash highlighter-rouge"><div class="highlight"><pre class="highlight"><code>git init
git add <span class="nb">.</span>
git commit <span class="nt">-m</span> <span class="s2">"initial project template"</span>
</code></pre></div></div>

<p>Then I can continue building normally.</p>

<hr />

<h2 id="why-this-matters">Why this matters</h2>

<p>AI agents are powerful, but without clear instructions they may create messy projects: too many files, unnecessary classes, unclear structure, or unsafe handling of secrets.</p>

<p>A small <code class="language-plaintext highlighter-rouge">AGENTS.md</code> file helps guide the work from the beginning.</p>

<p>It is not magic.<br />
But it gives the agent a clear direction.</p>

<p>For me, the goal is simple: every project should be clean, secure, understandable, and good enough to showcase later.</p>

<hr />

<hr />

<h2 id="references">References</h2>

<p>These filenames are based on the official documentation for each tool:</p>

<ul>
  <li>
    <p>GitHub Copilot repository custom instructions: <code class="language-plaintext highlighter-rouge">.github/copilot-instructions.md</code><br />
https://docs.github.com/copilot/customizing-copilot/adding-custom-instructions-for-github-copilot</p>
  </li>
  <li>
    <p>Claude Code project memory: <code class="language-plaintext highlighter-rouge">CLAUDE.md</code><br />
https://docs.anthropic.com/en/docs/claude-code/memory</p>
  </li>
  <li>
    <p>Codex custom instructions: <code class="language-plaintext highlighter-rouge">AGENTS.md</code><br />
https://developers.openai.com/codex/guides/agents-md</p>
  </li>
</ul>]]></content><author><name></name></author><category term="ai" /><category term="agents" /><category term="vscode" /><category term="copilot" /><category term="claude" /><category term="codex" /><category term="setup" /><summary type="html"><![CDATA[]]></summary></entry><entry><title type="html">Git &amp;amp; GitHub SSH Setup</title><link href="https://drkaziu.github.io/2026/04/22/setup-git-and-github.html" rel="alternate" type="text/html" title="Git &amp;amp; GitHub SSH Setup" /><published>2026-04-22T00:00:00+00:00</published><updated>2026-04-22T00:00:00+00:00</updated><id>https://drkaziu.github.io/2026/04/22/setup-git-and-github</id><content type="html" xml:base="https://drkaziu.github.io/2026/04/22/setup-git-and-github.html"><![CDATA[<h2 id="configure-git-one-more-time">Configure git one more time</h2>
<p>From time to time, I reset my dev systems and need to configure Git and GitHub once more.<br />
I’m sure there is an automated way, but I prefer doing it old school — going through my tech notes and setting everything up step by step.<br />
Sharing it here for future reference.</p>

<hr />

<h2 id="github-ssh--initial-project-setup">GitHub SSH &amp; Initial Project Setup</h2>

<h3 id="0-configure-git-identity">0. Configure Git identity</h3>
<div class="language-bash highlighter-rouge"><div class="highlight"><pre class="highlight"><code>git config <span class="nt">--global</span> user.name <span class="s2">"Your Name"</span>
git config <span class="nt">--global</span> user.email <span class="s2">"your_email@example.com"</span>
git config <span class="nt">--global</span> <span class="nt">--list</span>  <span class="c"># verify</span>
</code></pre></div></div>

<h3 id="1-generate-ssh-key">1. Generate SSH key</h3>
<div class="language-bash highlighter-rouge"><div class="highlight"><pre class="highlight"><code>ssh-keygen <span class="nt">-t</span> ed25519 <span class="nt">-C</span> <span class="s2">"your_email@example.com"</span>
</code></pre></div></div>

<p>Use a unique filename, e.g.:</p>
<div class="language-bash highlighter-rouge"><div class="highlight"><pre class="highlight"><code>~/.ssh/id_ed25519_github
</code></pre></div></div>

<h3 id="2-start-ssh-agent">2. Start SSH agent</h3>
<div class="language-bash highlighter-rouge"><div class="highlight"><pre class="highlight"><code><span class="nb">eval</span> <span class="s2">"</span><span class="si">$(</span>ssh-agent <span class="nt">-s</span><span class="si">)</span><span class="s2">"</span>
</code></pre></div></div>

<h3 id="3-configure-ssh">3. Configure SSH</h3>
<div class="language-bash highlighter-rouge"><div class="highlight"><pre class="highlight"><code><span class="nb">touch</span> ~/.ssh/config
open ~/.ssh/config
</code></pre></div></div>
<p>*If file does not already exist.
Then add:</p>
<div class="language-bash highlighter-rouge"><div class="highlight"><pre class="highlight"><code>Host github.com
  AddKeysToAgent <span class="nb">yes
  </span>UseKeychain <span class="nb">yes
  </span>IdentityFile ~/.ssh/id_ed25519_github
</code></pre></div></div>

<h3 id="4-add-key-to-agent">4. Add key to agent</h3>
<div class="language-bash highlighter-rouge"><div class="highlight"><pre class="highlight"><code>ssh-add <span class="nt">--apple-use-keychain</span> ~/.ssh/id_ed25519_github
</code></pre></div></div>
<p>This makes SSH login seamless and avoids repeated prompts while keeping the key secure (in a background process).</p>

<h3 id="5-copy-public-key">5. Copy public key</h3>
<div class="language-bash highlighter-rouge"><div class="highlight"><pre class="highlight"><code>pbcopy &lt; ~/.ssh/id_ed25519_github.pub
</code></pre></div></div>

<h3 id="6-add-key-to-github">6. Add key to GitHub</h3>
<p>Paste it in:<br />
Settings → SSH and GPG keys</p>

<h3 id="7-test-connection">7. Test connection</h3>
<div class="language-bash highlighter-rouge"><div class="highlight"><pre class="highlight"><code>ssh <span class="nt">-T</span> git@github.com
</code></pre></div></div>

<hr />

<h2 id="security-note">Security Note</h2>

<p>When connecting for the first time, verify GitHub’s SSH fingerprint.</p>

<p>Only trust it if it matches the official value from GitHub documentation.</p>

<hr />

<h2 id="initialize-and-push-project">Initialize and Push Project</h2>

<div class="language-bash highlighter-rouge"><div class="highlight"><pre class="highlight"><code>git init
git add <span class="nb">.</span>
git commit <span class="nt">-m</span> <span class="s2">"initial commit"</span>
git remote add origin git@github.com:username/repo.git
git push <span class="nt">-u</span> origin main
</code></pre></div></div>

<hr />

<h2 id="note">Note</h2>
<p>Official recommended steps can be found on GitHub https://docs.github.com/en/authentication/connecting-to-github-with-ssh/adding-a-new-ssh-key-to-your-github-account</p>]]></content><author><name></name></author><category term="python" /><category term="github" /><category term="ssh" /><category term="setup" /><summary type="html"><![CDATA[Configure git one more time From time to time, I reset my dev systems and need to configure Git and GitHub once more. I’m sure there is an automated way, but I prefer doing it old school — going through my tech notes and setting everything up step by step. Sharing it here for future reference.]]></summary></entry><entry><title type="html">Learning with Agents</title><link href="https://drkaziu.github.io/2026/04/16/looking-at-what-agents-learn.html" rel="alternate" type="text/html" title="Learning with Agents" /><published>2026-04-16T00:00:00+00:00</published><updated>2026-04-16T00:00:00+00:00</updated><id>https://drkaziu.github.io/2026/04/16/looking-at-what-agents-learn</id><content type="html" xml:base="https://drkaziu.github.io/2026/04/16/looking-at-what-agents-learn.html"><![CDATA[<p><img src="/assets/b400-9670-e7e6-cdfe.png" alt="agent learning" /></p>

<h2 id="project-idea-and-testing-ground">Project Idea and Testing Ground</h2>

<p>Agents don’t just generate code — they adapt to how you work. If you capture that learning, future outputs get better.</p>

<p>I ran a simple session with Copilot to generate a small Python script to rename blog images into hashed filenames. The goal was both to create the hashing script and to test whether agent learning can be formalized and reused across projects.</p>

<p>The session evolved through multiple iterations — refining structure, expectations, and workflow. Toward the end, I asked the agent to summarize what it had learned about my development style.</p>

<h2 id="experiment-results">Experiment Results</h2>

<p>Instead of raw conversation history, I forced a distilled output — something reusable by future agents (e.g. <code class="language-plaintext highlighter-rouge">SKILLS.md</code> or a similar specification file).</p>

<p>This is what I was given:</p>

<ul>
  <li>Use git and commit frequently</li>
  <li>Mention AI/agent contribution in <code class="language-plaintext highlighter-rouge">README.md</code></li>
  <li>Provide simple execution via shell/launcher scripts</li>
  <li>Keep repositories production-ready and public-safe</li>
  <li>Include clear documentation, a license, and supporting files</li>
  <li>Handle edge cases (e.g. quoted paths, preserve file extensions)</li>
</ul>

<p>Copilot also indicated it created <code class="language-plaintext highlighter-rouge">/memories/repo/expectations.md</code> with key development expectations — I’ll review that separately.</p>

<h2 id="takeaway">Takeaway</h2>

<p>Agents can externalize preferences into reusable specifications.</p>

<p>Repository: https://github.com/drkaziu/simple-image-hash</p>]]></content><author><name></name></author><summary type="html"><![CDATA[]]></summary></entry><entry><title type="html">PyCon Lithuania 2026 Notes</title><link href="https://drkaziu.github.io/2026/04/13/pycon-reflection.html" rel="alternate" type="text/html" title="PyCon Lithuania 2026 Notes" /><published>2026-04-13T00:00:00+00:00</published><updated>2026-04-13T00:00:00+00:00</updated><id>https://drkaziu.github.io/2026/04/13/pycon-reflection</id><content type="html" xml:base="https://drkaziu.github.io/2026/04/13/pycon-reflection.html"><![CDATA[<p>These are my key takeaways distilled from talks, side discussions, and patterns that kept repeating.</p>

<p><img src="/assets/pycon_sticker.png" alt="mac sticker" /></p>

<h3 id="software-engineering-is-shifting-from-code-to-systems-thinking">Software engineering is shifting from code to systems thinking</h3>
<ul>
  <li>Code is no longer the main asset, solutions are, “Code → test → refactor” still matters, but now
maintenance &gt; writing</li>
  <li>Great engineers delete more than they write</li>
  <li>Specification is the source of truth before, during, after coding</li>
  <li>Reverse engineering from code alone is no longer viable</li>
  <li>The job is evolving from writing code to designing systems that survive AI</li>
</ul>

<h3 id="ai-doesnt-replace-engineering-it-amplifies-it">AI doesn’t replace engineering, it amplifies it</h3>
<ul>
  <li>AI makes good practices better — and bad practices catastrophic</li>
  <li>“Vibe coding” ≠ software engineering</li>
  <li>AI-generated code often not maintainable, poorly understood, creates hidden technical debt</li>
  <li>Better to be 2–3× faster sustainably, not 10× faster and unmaintainable</li>
</ul>

<h3 id="documentation-became-critical-infrastructure">Documentation became critical infrastructure</h3>
<ul>
  <li>“The code is the documentation” → no longer true</li>
  <li>AI cannot see invisible context, if you don’t document, future engineers (and AI) will fail</li>
  <li>Keep docs close to code (plain text), document decisions, not just code</li>
  <li>Good docs today → better AI outputs tomorrow</li>
</ul>

<h3 id="the-real-bottleneck-is-no-longer-coding--its-maintenance">The real bottleneck is no longer coding — it’s maintenance</h3>
<ul>
  <li>Writing code is cheap</li>
  <li>Maintaining systems is expensive</li>
  <li>New reality is that code is an output, not an input</li>
  <li>Systems decay faster due to AI speed</li>
  <li>Companies must track technical debt and track AI-generated debt</li>
  <li>We can build anything” → now replaced with → “What should we NOT build?”</li>
</ul>

<h3 id="fundamentals-matter-more-than-ever">Fundamentals matter more than ever</h3>
<ul>
  <li>Despite all the AI you still need infrastructure, understanding, system design thinking, debugging skills</li>
  <li>Hiring is shifting - less focus on output, more on process and reasoning</li>
  <li>Abstraction is rising — but fundamentals are the only anchor</li>
</ul>

<h3 id="ai-is-a-social-shift-not-just-a-technical-one">AI is a social shift, not just a technical one</h3>
<ul>
  <li>Adoption is uneven: juniors → heavy usage, seniors → cautious, but reviewing AI output</li>
  <li>Companies now define AI budgets, AI strategies</li>
  <li>Some trends: middle management questioned, smaller teams by default, more remote work</li>
  <li>AI is behaving more like electricity than a tool</li>
</ul>

<h3 id="risk-security-and-regulation-are-catching-up-slowly">Risk, security, and regulation are catching up (slowly)</h3>
<ul>
  <li>Key risks: data leakage (GDPR), automation bias (“death by GPS”), overconfident AI outputs</li>
  <li>Best practices: never use production data → use Faker</li>
  <li>Sandbox everything</li>
  <li>Implement guardrails before/after LLM use</li>
  <li>Inform users instead of silently blocking</li>
  <li>Important idea: technology is not forbidden — its usage is</li>
</ul>

<h3 id="agents-are-the-new-computing-model">Agents are the new computing model</h3>
<ul>
  <li>The focus is shifting to memory management, tool orchestration</li>
  <li>Constraints are that context windows are limited</li>
  <li>More context ≠ better results</li>
  <li>Patterns emerging: multi-agent systems, model-as-a-tool (LLMs calling LLMs), disposable sub-agents</li>
  <li>We’re moving toward software factories run by agents</li>
</ul>

<h3 id="the-uncomfortable-truth-about-ai">The uncomfortable truth about AI</h3>
<ul>
  <li>Productivity gains don’t equal production impact</li>
  <li>Many AI-built features never ship</li>
  <li>Marketing &gt; reality (for now)</li>
  <li>And the biggest insight “The future isn’t what it used to be.”</li>
</ul>

<h3 id="key-takeaway">Key takeaway</h3>
<p>Code is cheap, decisions are expensive, maintenance is everything</p>
<ul>
  <li>The winners won’t be the fastest coders</li>
  <li>They’ll be the best system thinkers</li>
</ul>]]></content><author><name></name></author><summary type="html"><![CDATA[These are my key takeaways distilled from talks, side discussions, and patterns that kept repeating.]]></summary></entry><entry><title type="html">Turning an old Mac Mini into Server</title><link href="https://drkaziu.github.io/2026/03/28/mini-linux-homelab.html" rel="alternate" type="text/html" title="Turning an old Mac Mini into Server" /><published>2026-03-28T00:00:00+00:00</published><updated>2026-03-28T00:00:00+00:00</updated><id>https://drkaziu.github.io/2026/03/28/mini-linux-homelab</id><content type="html" xml:base="https://drkaziu.github.io/2026/03/28/mini-linux-homelab.html"><![CDATA[<h2 id="project">Project</h2>

<p>A brand new Mac Mini bought from eBay had been sitting unused for some time and deserved a second life instead of collecting dust. There was some hesitation to unbox it, but eventually the decision was made to put it to use. My goals were learn Linux properly (not just through VMs), build a small homelab, break things and (hopefully) fix them. This journey will be documented here with educational vibe.</p>

<p>This Mac Mini uses an HDD, so it is inherently slow. On the other hand, it provides a nice retro-like experience requiring a bit of patience for things to respond. AI and various tutorials helped write this blog, find tools, use commands, etc.</p>

<p>A brand new Mac Mini bought from eBay had been sitting unused for some time and deserved a second life instead of collecting dust. There was some hesitation to unbox it (200 USD value vanish instantly), but eventually the decision was made to put it to use. The goals were to learn Linux properly (not just through VMs), build a small homelab, and break things and (hopefully) fix them. This journey is documented here with an educational focus.</p>

<p>This Mac Mini uses an HDD, so it is inherently slow. On the other hand, it provides a retro-like experience, requiring a bit of patience for things to respond. AI and various tutorials were used to help write this blog, discover tools, and understand commands. All commands here provided considering Mac environment.</p>

<p><img src="/assets/retro_mac_server.jpeg" alt="mac sticker" /></p>

<h2 id="hdd-clean">HDD Clean</h2>

<p>Before INSTALLING, the disk was wiped using Parted Magic — honestly a really good tool for low-level disk operations.</p>

<h2 id="install-media">Install Media</h2>

<ul>
  <li>Download Ubuntu Server LTS. The server version has no GUI, making it lighter and faster. LTS provides about 5 years of support, but does not include the latest features. A GUI can be installed later using: <code class="language-plaintext highlighter-rouge">sudo apt install ubuntu-desktop</code></li>
  <li>Run <code class="language-plaintext highlighter-rouge">diskutil list</code></li>
  <li>Find the external drive identifier (physical, external), e.g. <code class="language-plaintext highlighter-rouge">/dev/disk4</code></li>
  <li>Unmount the disk: <code class="language-plaintext highlighter-rouge">diskutil unmountDisk /dev/diskX</code></li>
  <li>Write the ISO image to the disk using the following command (powerful and potentially dangerous): <code class="language-plaintext highlighter-rouge">sudo dd if=/Users/username/Downloads/ubuntu-24.04.4-live-server-amd64.iso of=/dev/diskX bs=1m</code>. Note that <code class="language-plaintext highlighter-rouge">dd</code> is often called “disk destroyer” — it copies data byte by byte in chunks (<code class="language-plaintext highlighter-rouge">bs=1m</code>) from the input file (<code class="language-plaintext highlighter-rouge">if=</code>) to the output disk (<code class="language-plaintext highlighter-rouge">of=</code>)</li>
  <li>Eject the disk: <code class="language-plaintext highlighter-rouge">diskutil eject /dev/diskX</code></li>
</ul>

<p>Note that on an old Mac Mini, this method caused installation issues (it worked fine on non-Apple machines). Instead, Balena Etcher was used, which handled everything more reliably and saved time debugging boot problems. In any case, the manual approach is a good exercise to understand how data is copied byte by byte — a more raw, low-level experience.</p>

<h2 id="handshake">Handshake</h2>

<p>Now it is time to use this headless machine.</p>

<ul>
  <li>
    <p>Run <code class="language-plaintext highlighter-rouge">hostname -I</code> on the server machine to get its IP address, or find it via the router interface</p>
  </li>
  <li>
    <p>SSH may not be enabled by default, then run: <code class="language-plaintext highlighter-rouge">sudo systemctl enable ssh</code> and <code class="language-plaintext highlighter-rouge">sudo systemctl start ssh</code></p>
  </li>
  <li>
    <p>Update packages using <code class="language-plaintext highlighter-rouge">sudo apt-get update</code> and <code class="language-plaintext highlighter-rouge">sudo apt-get upgrade</code>. The <code class="language-plaintext highlighter-rouge">update</code> command refreshes the package list with available versions, while <code class="language-plaintext highlighter-rouge">upgrade</code> installs them. Without running <code class="language-plaintext highlighter-rouge">update</code>, the package list may be outdated</p>
  </li>
  <li>
    <p>On the main laptop, connect using: <code class="language-plaintext highlighter-rouge">ssh username@local.ip.add.ress</code>, where <code class="language-plaintext highlighter-rouge">username</code> and <code class="language-plaintext highlighter-rouge">local.ip.add.ress</code> should be replaced with actual values</p>
  </li>
  <li>
    <p>Enter the password; if everything works, access to the server is established</p>
  </li>
  <li>
    <p>Exit the session using: <code class="language-plaintext highlighter-rouge">exit</code></p>
  </li>
</ul>

<p>This is a simple setup, but password-based login should be disabled as soon as possible. This will be covered next.</p>]]></content><author><name></name></author><summary type="html"><![CDATA[Project]]></summary></entry></feed>